It is very easy to turn the Getting Started feature on or off in Microsoft Dynamics CRM 2011.

1) Click on Administration under Settings

2) Click on System Settings

3) Click on NO in the get started pane area

Posted by duanenapier on May 18, 2011
It is very easy to turn the Getting Started feature on or off in Microsoft Dynamics CRM 2011.
1) Click on Administration under Settings
2) Click on System Settings
3) Click on NO in the get started pane area
Posted in Microsoft Dynamics CRM, Microsoft Dynamics CRM 2011 | Tagged: getting started pane, help window, Microsoft Dynamics CRM 2011, system settings | Leave a Comment »
Posted by duanenapier on May 11, 2011
There can be many uses for web resources. This post will describe how to swap images using the HTML imagemap element in Microsoft Dynamics CRM 2011 forms using web resources.
Let’s first assume that you have some valid reason why you would want to swap images out first of all and you would like to expose this in CRM. You may have an image of a building that you would like to allow some click through functionality, possibly to drill into other images giving you “zoom-in” functionality like Bing Maps or Google Earth. For this post I will use one of my real world examples that I use in my demo’s. I work for Avanade and we have developed several assets around Microsoft Dynamics CRM. The Relationship Tree asset shows related data in a graphical manner. I really like to show this asset in my demo’s but as of April 2011 we had not released our Relationship Tree asset for CRM 2011 yet. So in order to show the asset in CRM 2011 I had to do a little “smoke and mirrors” with web resources to basically simulate how the asset works. I accomplish my “smoke and mirrors” by using 2 html files and 2 png images. All 4 files are loaded into Microsoft Dynamics CRM as web resources and then I tie them all together.
Steps to follow:
1. Create your images (I use 2 in this example)


2. Write your HTML pages (I use 2 in this example)
a. In my example, you can expand and collapse the data associated to someone under the Holdings node. There are 2 things to understand in order to make sense of this:
1) The first HTML file uses the 1st png file as the image. The imagemap in this 1st HTML file points to the 2nd html file. When the user clicks on the + “plus sign” next to “Holdings” the image will appear to expand.
2) The second HTML file uses the 2nd png file as the image. The imagemap in this 2nd HTML file points back to the 1st html file. When the user clicks on the + “plus sign” next to “Holdings” the image will appear to collapse.
b. Additional Items:
1) You will need to test your html pages locally to make sure the mouse click properly swaps your images. Notice that I have commented out the lines of HTML for my local image and local HTML.
3. Upload the 2 image files as web resources
a. Additional Items:
1) Note the URL of the web resource because you will need to change your HTML to point to this location. Once you upload the first image file you will be able to deduce what the URL will be for the subsequent files you upload as web resources. You will see in my example that the URL path was:
https://My OnLine Environement//WebResources/THE NAME I GAVE MY RESOURCE HERE

2) CHANGE your HTML to point to the new URL of the image and HTML files.
4. Upload the 2 HTML files as web resources
Here is the syntax of my 2 HTML files for your reference:
ContactRelTree1.html:
<html>
<body>
<!–COMMENTED OUT- THIS IS THE ACTUAL SYNTAX USED IN MY CRM ENVIRONMENT <img src=”https://avanade34.crm.dynamics.com//WebResources/new_RelTree1_png” usemap=”#navigation” border=”0″> –>
<!– COMMENTED OUT-This is my test line when the image was local on my machine<img src=”RelTree1.png” usemap=”#navigation” border=”0″> –>
<img src=”http://g97eia.bay.livefilestore.com/y1pk8d-PK5Rq9wMFcMGdeeLq01Cg6F8JxGkJ7kuwsWwTE-ApQgs4aztXpoRwvNyvIgsLgY1SGC7gRHYo8Y89zKkTpmgN-4pufl8/RelTree1.png?psid=1″ usemap=”#navigation” border=”0″>
<map name=”navigation”>
<area shape=”rect” coords=”24,83,40,99″ href=”http://g97eia.bay.livefilestore.com/y1puw2En7o62lFP1madagrWnCV7fZYvp631RcBnUC5ghB7RAU-kNmwVITUqB0iv62X7HuHQD34g02BQoKrB3uvnREVGSB-KZ8DZ/ContactRelTree2.html?psid=1″>
<!–COMMENTED OUT-THIS is my test line when the HTML file was local on my machine <area shape=”rect” coords=”24,83,40,99″ href=”ContactRelTree2.html”> –>
</map>
</body>
</html>
ContactRelTree2.html:
<html>
<body>
<!– COMMENTED OUT- THIS IS THE ACTUAL SYNTAX USED IN MY CRM ENVIRONMENT <img src=”https://avanade34.crm.dynamics.com//WebResources/new_RelTree2_png” usemap=”#navigation” border=”0″> –>
<!– COMMENTED OUT-This is my test line when the image was local on my machine <img src=”RelTree2.png” usemap=”#navigation” border=”0″> –>
<img src=”http://g97eia.bay.livefilestore.com/y1pntSs_KKA1NONWEW-9GiQ5a-OVeVd-5UZF5U4GDzMsSIhn0vKoAW5rFgRKU2X0PGe2g_NDQPJk2oAAT1TtnUIeYiGYHzQ86u4/RelTree2.png?psid=1″ usemap=”#navigation” border=”0″>
<map name=”navigation”>
<area shape=”rect” coords=”24,83,40,99″ href=”http://g97eia.bay.livefilestore.com/y1pU-jMj7S3axx2-UpXt1Fy_iHRFkTBYGiB6ZcKFtDOtGFk9QlgWmTdP2xEOeiVh2vi8rYcsbdJ-Gt19iZ_CNolKFcH25bAk0jr/ContactRelTree1.html?psid=1″>
<!– COMMENTED OUT-THIS is my test line when the HTML file was local on my machine <area shape=”rect” coords=”24,83,40,99″ href=”ContactRelTree1.html”> –>
</map>
</body>
</html>
Posted in Microsoft Dynamics CRM 2011 | Tagged: Avanade, Form OnLoad, HTML, imagemap, Web Resource | Leave a Comment »
Posted by duanenapier on May 3, 2011
This post steps you through the process of adding an entity that has a Many To Many (N:N) relationship to the left hand navigation on a form.
It is relatively easy to add an entity that has a Many to Many relationship to the Entity Navigation Pane. If this sounds a little foreign, think of it this way, assume I have a Contact in CRM that I would like to be associated to many restaurants. I would also like the restaurant to be associated to many Contacts. I would set up the Many To Many relationship in Microsoft Dynamics CRM then I would need to ‘expose’ that relationship on the Contact form and\or on the Restaurants form. This post will briefly provide the simple steps and a video to explain how to expose the Many To Many relationship.
1) In the form designer click on the Navigation icon.

2) In the right hand side of the form in the Relationship Explorer area click on the Available Relationships filter and select N:N Relationships. This step is very simple but easy to miss.

3) Select the desired Entity and drag it into the Entity Navigation Pane on the left hand side of the form.

Take a moment to get your breath (because you’re probably winded by now)…save and publish your changes and you’re done. Pretty hard huh? Just in case you couldn’t follow those steps here is a video how to do it as well:
Posted in Microsoft Dynamics CRM 2011 | Tagged: Customize Forms, Entity Navigation Pane, form designer, Many To Many Relationship, Microsoft Dynamics CRM 2011, N:N, Relationship Explorer | Leave a Comment »
Posted by duanenapier on April 29, 2011
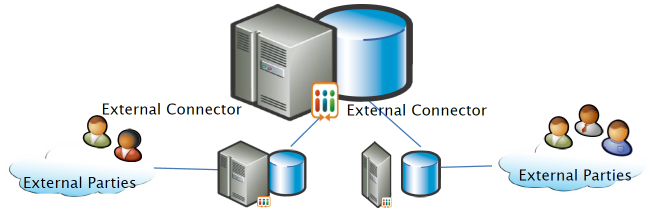
Starting with Microsoft CRM 3.0, Microsoft created an External Connector License. This post will outline the External Connector respective to Microsoft Dynamics CRM 2011.
What is this license?
This license allows you to expose CRM data to your customers utilizing a portal strategy. The customers that you have explicitly given access to CRM data will not log into you’re your Microsoft Dynamics CRM 2011 web site nor will they use Outlook to access the CRM data. These customers will access your portal to interact with the CRM data that you have been given access to. There is an accelerator to help you set up a portal and expose a handful of entities, it is found here http://customerportal.codeplex.com/.
When do I need the External Connector License?
According to Microsoft sources, you only need the external connector license when On-Premise is used and NOT when using Microsoft hosted CRM Online.
In the case of a web portal, the users are not logging directly into the application in this case CRM Online (MS Hosted) and can authenticate username & password via a variety of non-WLID protocols, so Microsoft Dynamics CRM Online allows non-licensed access in those scenarios. This includes read/write access to data that can two-way synch w/the Microsoft Dynamics CRM database. The users are not accessing Microsoft Dynamics CRM UI i.e. forms and views etc. This is VERY different from On-Premise and so is understandably confusing. Most of the Microsoft Dynamics CRM competitors charge extra for this type of access so in the case of a customer using Microsoft hosted CRM Online, this is a nice “loop-hole” for them. If a customer is using Microsoft Dynamics CRM On-Premise then they need to utilize the External Connector License.
Are there any limitations with the External Connector License?
Yes there are, below is an excerpt from the Pricing and License Guide which lists the capabilities of using the license:
External Connector – The External Connector provides external users with limited API access and limited read-write access to Microsoft Dynamics CRM 2011 data, such as that provided through any application/graphical user interface. The External Connector SKU will appear on price lists as the DynCRMExtConn.
The use rights supported for External Connector include:
• Read-only access to Accounts, Contacts, Cases, Leads, Activities, and Custom entity records.
• Data privileges to create Accounts, Contacts, Cases, Leads, Activities, and Custom entity records.
• Data privileges to append, append to, and update Accounts, Contacts, Cases, Leads, Activities, and Custom entity records created by any CRM user.
• No data privileges to assign, share, or delete records.
• Access to CRM server software and “Microsoft Dynamics CRM functionality” through any application/graphical user interface (GUI), other than the Microsoft Dynamics CRM client.
Posted in Microsoft Dynamics CRM 2011 | Tagged: Customer Portal, Customer Portal Accelerator, external access, External Connector, Microsoft Dynamics CRM 2011 | Leave a Comment »
Posted by duanenapier on April 28, 2011
Social Media has growth tremendously over the past few years and it definitely has its place in CRM.
Your use of social media such as LinkedIn and potentially Facebook can help build deep personal ties with your contacts. There are several 3rd party components in the marketplace that can integrate with Microsoft Dynamics CRM 2011, one particular is InsideView. When this solution is imported into your CRM environment, this component will pull information from multiple sources into an iFrame on your Company and Contact forms. If you can easily review a contact’s LinkedIn, Facebook and personal blog site right from the Contact form, think how you could use that personal information to help foster deeper relationships with that contact.
To provide you with a practical use, I have created an “Annual Event” entity in CRM to capture data that I would like CRM to remind me of respective to my Contacts. In the screenshot below you can see that I found out that Kevin is an avid motocross fan and that he and his son Justin have been going to the annual Indianapolis Supercross event since 1993. I would like to have CRM send me a reminder 30 days before the event each year so that I can touch base with Kevin about the event. I may want to purchase tickets for Kevin, sponsor an event or even tag along if it’s something that I share a common interest in. Whatever the scenario, I can use CRM to help build deep personal relationships.
This is one example how I can extract personal information about my contacts through the use of social media. I can record that data in CRM and use the platform to allow me to stay on top of items that are not inherently important to me, but are important to my clients.

InsideView component in CRM 2011:

Posted in Microsoft Dynamics CRM 2011 | Tagged: blog, facebook, InsideView, linkedin, social media | Leave a Comment »
Posted by duanenapier on April 12, 2011
This post will focus on the new Xrm schema and cover getting the values for text fields, picklist fields and lookup fields in CRM 2011.Refer to the Web Resources post for specifics how to create and use JavaScript files.
Get the value from a Lookup Field:
//1st Thing – You need to create an Array variable
var UserlookupItem = new Array;
var OpportunitylookupItem = new Array;
//2nd Thing – You need to get the Value. The getValue function will return the respective object’s return type. In this case it will return an Array because the Coverage Member I have created is a lookup to the user table.
UserlookupItem = Xrm.Page.getAttribute(“new_coveragemember”).getValue();
OpportunitylookupItem= Xrm.Page.getAttribute(“new_opportunity”).getValue();
//3rd Thing – Get the first item in the array, which is the name.
var MyNewName;
MyNewName = UserlookupItem[0].name;
MyNewName += ‘-‘ + OpportunitylookupItem[0].name;
alert(MyNewName);
Get the value from a Picklist Field:
//You may want the ordinal value or the text value so we will grab both
//1st Thing – Get the ordinal, or integer value using getValue()
var intListItem = Xrm.Page.data.entity.attributes.get(“CompanyType”).getValue();
//2nd Thing – Get the text value using getText()
var txtListItem = Xrm.Page.data.entity.attributes.get(“CompanyType”).getText();
Get the value from a Text Field:
//1st Thing – 1 simple function call of getValue() can grab the value
var WebSite = Xrm.Page.data.entity.attributes.get(“WebAddress”).getValue();
alert(WebSite);
Posted in JavaScript, Microsoft Dynamics CRM 2011 | Tagged: getText, getValue, JavaScript, lookup, picklist, selected text, selectedtext, value, Xrm, Xrm.Page | Leave a Comment »
Posted by duanenapier on April 4, 2011
The use of JavaScript in forms has changed from Microsoft Dynamics CRM version 4.0 to Microsoft Dynamics CRM 2011. Below are some main differences from CRM 4.0 to CRM 2011 & 2013:
Reference Images:
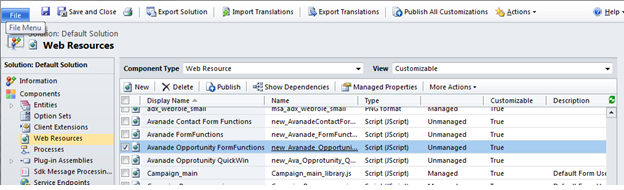
Web Resources Image:
CRM Form Properties Image:
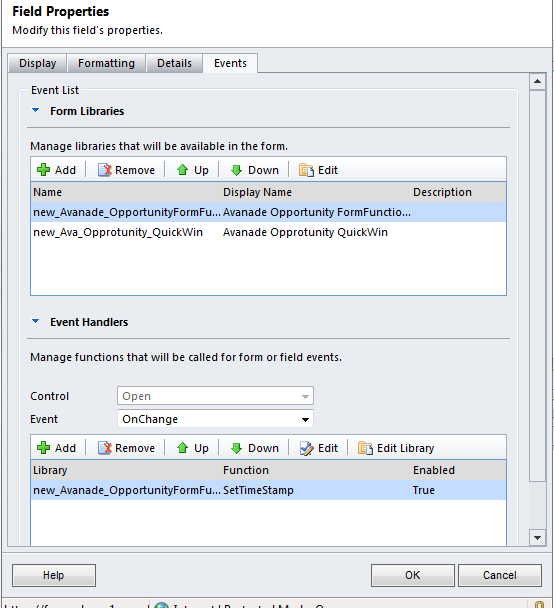
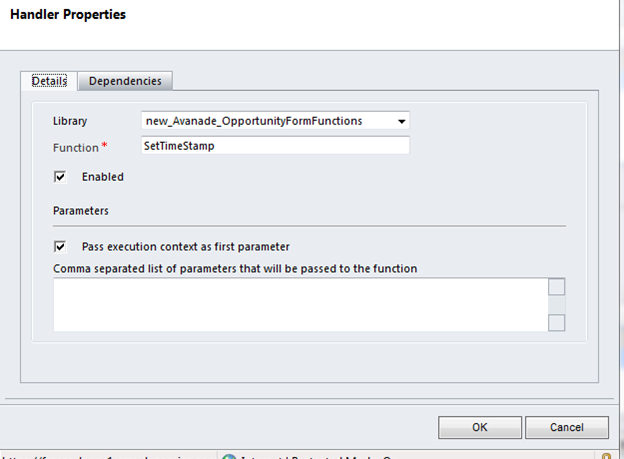
Form Event Properties:
(This is opened by clicking the Add button above. Notice that you can Pass the object that is calling the call into the function.)
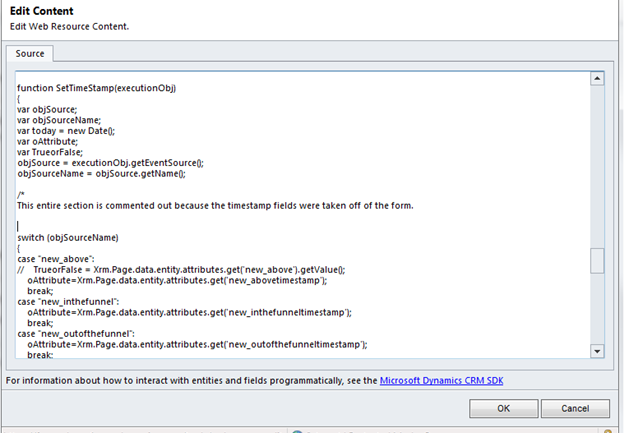
Web Resource Content:
(Notice the code that interprets the ExecutionObject ( executionObj in the function ) that was passed into the function call.)
Posted in JavaScript, Microsoft Dynamics CRM | Tagged: CRM 2011, execution Object, executionObj, executionObject, Form Library, function example, JavaScript, Microsoft Dynamics CRM 2011, selectedtext, Web Resource, Xrm, Xrm.Page | 1 Comment »
Posted by duanenapier on January 8, 2011
Here is some high level information on Goals and Rollup Queries in Dynamics CRM 2011.
Goals:
• The “Sales Goals” CRM Accelerator is now baked into 2011
• I think of Goals as basically “query records”, meaning they query data that match the criteria outlined in the goal so you don’t have to ‘manually’ associate Opportunity records to a specific goal, the system dynamically associates them.
> Goals are either revenue based or count based.
• Components of a Goal:
> Owner
>>This can be a user or a TEAM.
> Time Period
>> Fiscal period or custom period
> Target
>> (Quota)
> Parent Goal
> Child Goals
> Goal Metric
>> Either a Count of something or Amount (Money, Decimal or Integer)
• Related records of Goals are “In Progress” records and “Actual” records.
> If an Opp is open it will be In Progress vs. Won it will be an Actual
Rollup Queries:
> These are queries that are associated to Goals that further filter the records that should be associated to the goal.
> In the Goal Criteria section of a Goal you can select which Rollup Query to use.
Posted in Microsoft Dynamics CRM 2011 | Tagged: crm 2011 rollup, Goals, Microsoft Dynamics CRM 2011, Rollup Queries | Leave a Comment »
Posted by duanenapier on January 5, 2011
Microsoft Dynamics CRM 2011 now allows teams to own records. Here are some tidbits about using the Team as an owner:
• If you want a team to own records you have to assign a security role to the team just like a user, otherwise you will get an error on assignment.
• Looking into security I was half-way expecting to see a Team security level (like User or Child-BU, Etc.) but there is none. The security levels are the same as in 4.0. The Team has to belong to a BU just like a user so the record will reside in the BU of the team.
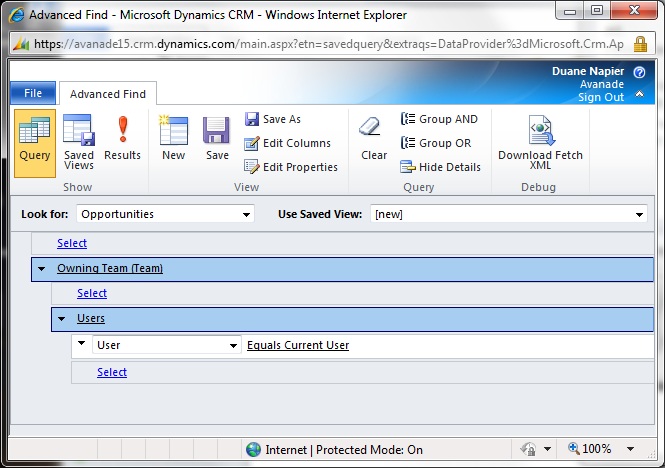
• If a user has User security level privileges and that user belongs to the Team that owns the record, one may expect that the user would see the records owned by the Team in their OOB ‘My’ lists but that isn’t true.
o You will have to create Views to show My Team’s records. The Advanced Find example below shows the Opportunities that belong to a Team that I am a member of.
Posted in Microsoft Dynamics CRM 2011 | Tagged: CRM2011, Share, Team | Leave a Comment »
Posted by duanenapier on July 27, 2010
This is considered to be an unsupported change but the risk is minimal provided you follow these steps.
1) Make a backup copy of the C:\Program Files\Microsoft CRM Server\CRMWeb\_imgs\masthead.jpg file.
– If you mess anything up you can simply place this file back into the directory later.
2) Create your own logo and name it masthead.jpg.
3) Place this file in C:\Program Files\Microsoft CRM Server\CRMWeb\_imgs\masthead.jpg.
When you refresh your browser the new logo will appear.
Posted in Microsoft Dynamics CRM 4.0 | Tagged: CRM header logo, logo, Microsoft Dynamics CRM logo | 1 Comment »
